

Originally published on January 30, 2018
PrinterLogic comes with a built-in network scan tool that allows IT staff to scan their subnets to locate network attached printers. It creates a csv file that contains the printer’s IP Address, Hostname, Model, and Serial number. Using this data, you can then easily add the printers into the PrinterLogic software to start managing them. In this blog we will go over how to use the network scan tool and go over a couple of tips when using this tool to easily add and start managing your printers.
- Log into the PrinterLogic administration webpage. (Typically, you’ll type the FQDN or DNS Alias into your web browser followed by “/admin”)
- Go to the top right of the webpage and select “Tools”
- Select “Import/Export > Network Scanner”

- In the Network Scanner program, type in the subnet that your printers are on. The format you should follow is listed at the top left of the program. If you are using special SNMP community names on the printers then you can specify the community name you use by adding “:communityName” at the end of your subnet as seen in the format example.
Tip: You can put multiple subnets into the tool by hitting the return key on your keyboard and adding another line. I recommend no more than 5-10 subnets at a time.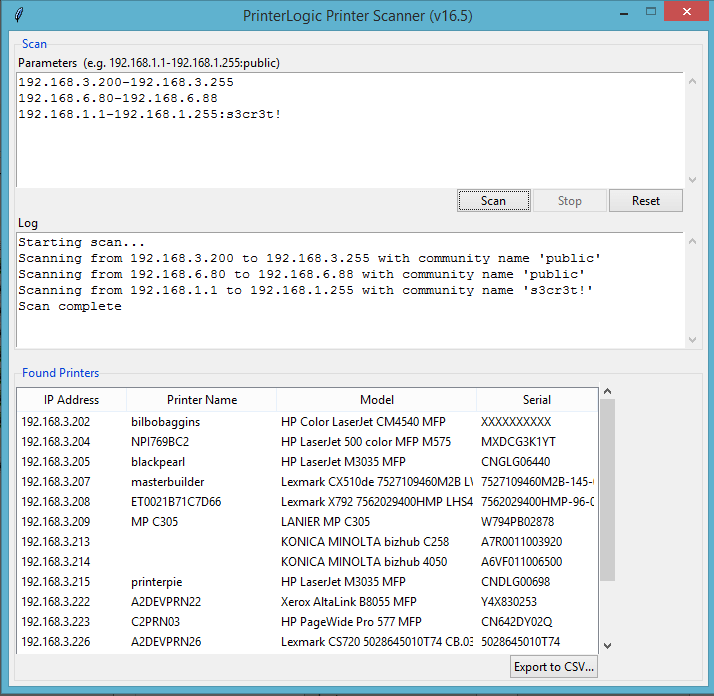
- Complete the scan by clicking on “Export to CSV…” in the bottom right corner and open the CSV file.
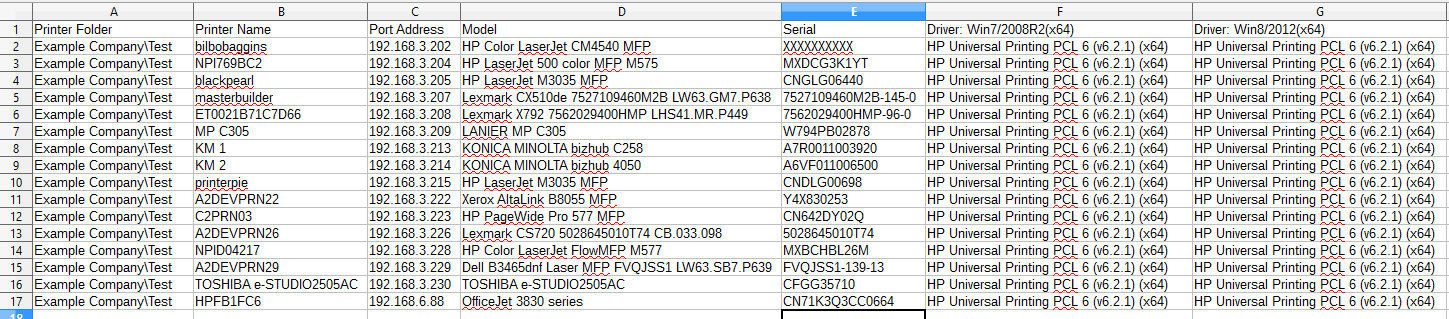
- Next, you’ll edit the CSV file. You must put the location of where the printers are supposed to show up in the Administration webpage of PrinterLogic. You can do this one of two ways:
- Create the folders in the PrinterLogic Administrator webpage first. Then you will add in the CSV to the column called “Printer Folder” the file path that you created. It will look something like “TopLevelFolderSubfolderSubfolder”.
- You can add file paths of what you want your folder structure to look like by putting in the path “TopLevelFolderSubfolderSubfolder” in the “Printer Folder” column. When you upload the CSV file into PrinterLogic it will create those folders if they don’t exist.
- Check and make sure there is a Printer Name assigned to each printer and that each printer has a Printer Folder that it will be placed in.
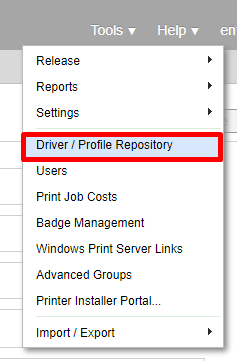
- The best thing you can do at this point is add drivers to the PrinterLogic repository. You can locate and upload drivers by going to “Tools > Driver/Profile Repository” in the Administration webpage.
- By doing this, you can associate those drivers with the printers on your CSV file. I would follow these steps:
- Upload the drivers to PrinterLogic’s driver repository
- Open the CSV file and delete any Driver column starting from Column F and going to Column O that you don’t need.
- Add the name of the driver EXACTLY as it shows up in the PrinterLogic repository to the correct Column.
- Finish by going to the PrinterLogic Administration webpage and select “Tools > Import/Export > Data Manager”

- Select “Insert” for the Action, “CSV” for the Format, and “TCP/IP Printer” for the Data Type
- Select “Upload CSV File” and select the saved CSV file
- Make sure the Columns match the data that is in the CSV file and click “Import”
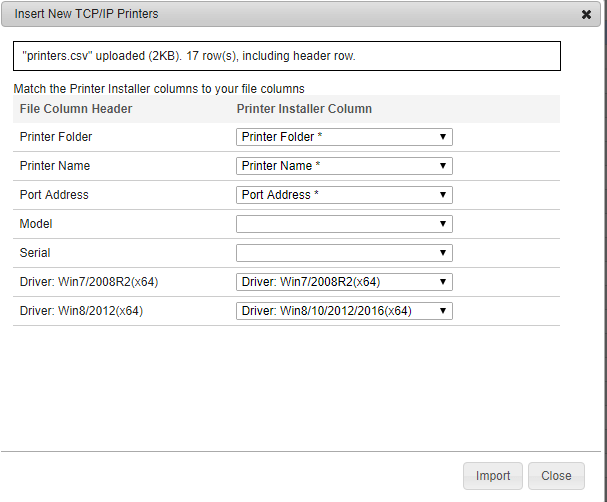
- If there are warnings then you will be able to download a csv explaining the errors. If there are none then you are finished and the tool will let you know it completed without warnings.
This powerful tool is designed to be simple and quick. We have seen this tool not only be used to gather printers into PrinterLogic to manage them, but it has also been used to track down printers that IT Administrators didn’t even know were added to the network. Take advantage of this tool in your instance of PrinterLogic, or if you are seeing this for the first time, you can acquire a free complimentary proof of concept of PrinterLogic by going to printerlogic.com.